
The most economical and fun motor vehicles are bicycles with a motor fitted. These instructions guide you step by step on how to build a motorized bike.
Best practice guidelines help you through the process of safely fitting an bicycle motor kit onto your bike.
There are a couple of things to check before fitting a bicycle with gas motor.
A good installation starts with knowing which bicycles are easy to install motors on. It may save a lot of money, time, and effort, purchasing a suitable bicycle rather than trying to bend the motor to fit your bicycle.
If you have never installed a bicycle motor kit before, if your DIY skills are not up to par, or if you simply don’t have a good selection of tools, then you may want to refer to our section on choosing the correct bicycle. The article could make all the difference.
If you are confident that you have the right bicycle, you should check the parts in the motor kit that you have purchased.

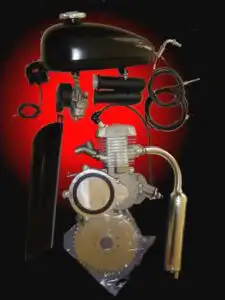
2. Carburetor and air filter
3. Throttle control & cut-out switch with leads and left side handle bar grip.
4. Bicycle motor & mounting clamps
5. Handle bar mounted clutch lever
6. Clutch cable and fittings.
7. Throttle cable.
9. Ignition cdi box.
10. Rear sprocket
11. Drive chain and chain tension roller.
12. Bag of hardware and fittings.

Most bicycle motor kits are purchased from Amazon suppliers. The first rule of how to install a motor on a bicycle is to check that everything in the motor kit is OK and nothing has been damaged in transit.
If you ordered any extra items, make sure they are there. You should also check that the motor is the model you ordered. A rule of thumb for engine capacity is that 50cc 2-stroke engines have 10 mm head bolts and 80cc motors have 16 mm head bolts.
If any parts are missing, you should contact your supplier straight away as transactions are usually finalized 30 days after the order was placed.
Before you go further with how to install a motor on a bicycle, you should familiarize yourself with the various items in the kit and what they are for.
Examine how the components interact with each other and where they could fit on the bike. Thinking things through and planning how things may fit will make the job much easier down the track.
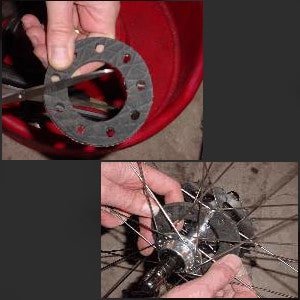
1. Find the two rear sprocket rubber packing pieces. Cut only one of them between the drilled holes, as shown image.
2. Place the cut packing piece inside the spokes.
3. Place the other packing piece on the outside of the spokes.
4. Place the metal support segments against the rubber inside the wheel and the sprocket on the outside, with the teeth offset inwards. That is, the step on the teeth is towards the wheel spokes. Overlap the split of the inner rubber with one of the plates (see images). Bikes with large tires may need to reverse the sprocket. Reversing the sprocket will provide a little more distance between the sprocket teeth and the spokes which can help the chain clear the rear tire.
5. Push the nine bolts through the sprocket, outer rubber, the inner rubber, and finally the support pieces.
6. Place washers and nuts on the bolts and tighten them so the assembly is loosely held together with light pressure on the spokes. All nuts need to have the same amount of thread protruding.
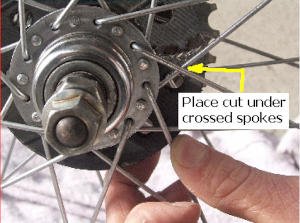

This picture shows the sprocket mounting from the inside of the rear wheel
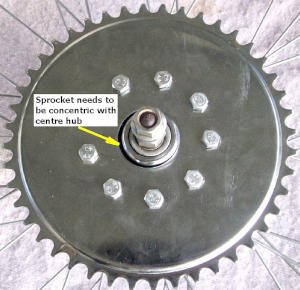
Try to get the sprocket as close to the center of the wheel as possible. If the sprocket is not centered, the chain will stretch faster and will be difficult to adjust with the chain tensioner.
7. Align sprocket and center hub so the gap is even all round. Use a block of wood and a hammer against the teeth to tap the sprocket into position, if necessary. (Image shows misaligned sprocket).
8. Tighten the nuts and bolts 2 full turns in a criss cross or star pattern and check the hub alignment again and adjust if necessary Tighten the nuts and bolts another full turn moving in a star fashion across the sprocket.
9. Repeat this process twice more, checking the alignment as you go. The nuts should now be tight enough to hold the sprocket firmly against the spokes but have some flexing in the drive direction.
10. Spin the wheel and check that the sprocket runs true. A run-out of more than 1 /2” may cause the chain to bind, jam or jump off the sprocket.
Correct any side to side wobble by tightening the nuts where the sprocket is further from the spokes and slackening the nuts a little on the opposite side. This will pull the sprocket back into alignment.
If there is a gap between the two rubbers, tighten all the nuts evenly, until the rubbers are just touching.
Do not over tighten the nuts. The rubbers provide a degree of shock absorption from the chain drive. If the rubbers are over tight there will be less “give” in the sprocket and a greater likelihood that you could pull spokes from the rim while riding.
If there is still some run-out, use a large shifting spanner to bend the section of sprocket giving trouble. You do not need to use much force to do this.

11. Place the wheel in the bike frame and install it as indicated in the bicycle instruction manual. At this time leave the axle retaining nuts finger tight, they will be tightened later when the drive chain alignment is set. Check the wheel and sprocket run true and adjust if necessary. Make any further adjustments if required.
Do not use "bolt through the frame" large frame adaptors
Vibration is a serious concern with all single cylinder bicycle engines, so it is a good idea to use rubber pads (about 3 mm thick) between the mounts, the clamps and the frame. The tube failure in the image was due to poor installation technique.
Many bicycle engine kits supply a “bolt through the frame” to assist fitting to large frame bikes. This practice is illegal in many country’s as it weakens the bicycle frame and is potentially dangerous for the rider. This means no drilling, cutting, bending, grinding or welding. This is why the bicycle motor and fuel tank mounts are designed as they are.
If the motor is not mounted securely, you will have constant problems with the motor twisting in the frame. The result will be broken engine mounts and studs. In addition, the chain tension and alignment will be problematic. Taking extra care with the mounting process will save hours of work, frustration and money.
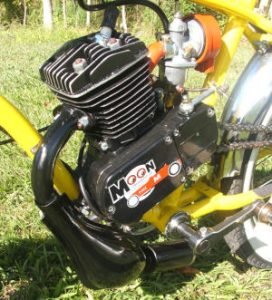
This image shows the engine mounted on the bike. Notice the intake inlet clearance. Always mount air intake with inlets down! If you need to, you can put the air box on a grinder and cut down on the inlet tubes a little to make sure they clear the frame. If you use the spacer on the front engine mount, usually this provides enough clearance. You may need to file down any water bottle screw mounts if they protrude and are in the way of a engine mount.
Before you stat the installation, check how the motor, carburetor and muffler will be positioned
This is the most important part of how to install a motor on a bicycle. Secure mounting the engine will prevent many problems developing when riding the bike.
1. Offer the motor up to the frame to make sure it will fit. Put the carburetor assembly temporally in place to check for clearance of the air filter and the throttle cable. Also remember to check the drive chain alignment and do a trial fit of the exhaust pipe. It needs to clear the ‘down tube’ and not be struck by the LH pedal.
Note: It is rare that the motor will go straight into the frame. The following guidelines will help you avoid the
usual pitfalls when installing the motor.
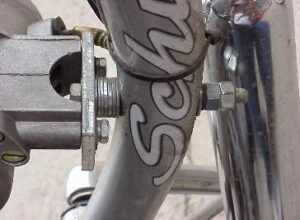
• The carburetor needs to be horizontal or tilted up or down to a maximum of 10° (see image)
• It is best to mount the motor as far forward as possible. If the front tube is larger in diameter a large tube mounting kit for tube diameters up to 3″ are available from bicycle motor retailers and hardware stores.
Mount the motor high enough in the frame to clear any controls or brackets on the Seat Stay (see image above right and center).
• Rework the mounts so they are a good fit in the frame. Adding rubber pads (about 1 /8” thick) helps reduce engine vibration and helps the mounts to grip the frame. Spacers and longer mounting studs are available from retailers.
NOTE: The rear engine mount must always be at right angles to the seat stay
• Do as little re-working of the front mount as is possible, better to re-arrange the rear mount to suit the frame.
(See images for ideas. If you need further help, contact us via the blog feedback page.) Make sure the chain will clear the bike frame and run straight between the two sprockets. Moving the motor mounting position up or down and leaning it a small amount to one side may, solve this problem.
• Remove the three screws retaining the sprocket cover (be careful not to loose the small bar and ball sitting in the center of the sprocket shaft), and using a piece of cord to check where the chain will sit, which will give you an idea of how much clearance you have.
2. After making the necessary modifications and adjustments, mount the engine into the frame. The mass of the motor and the vibration created when it is running can cause havoc. Snug fitting mounts and clamps, together with firmly secured (but not over-tight) nuts, are essential.
Check the nuts frequently for security after the first few runs and any time there appears to be a change in engine vibration.